Flashing Types Guide: Step Flashing, Counterflashing, and Valley Metal
A roof can look flawless from the street and still leak if the details at the transitions are neglected. At Worthy Construction LLC, we focus on the places where water naturally concentrates: the intersections between roof planes and walls, the edges around chimneys, and the channels that carry runoff downhill. In this guide, we break down step flashing, counterflashing, and valley flashing metal in clear, practical terms, so we can make informed decisions that protect framing, insulation, drywall, and everything underneath.
Why Roof Flashing Matters More Than Shingles
Shingles and tiles are designed to shed water on broad surfaces, but they are not engineered to seal complex joints on their own. Roof flashing is the set of shaped metal (or compatible materials) that forms a durable, directed pathway for water where roofing materials meet walls, chimneys, skylights, dormers, valleys, and roof edges.
When flashing is properly layered, water is guided back onto the roof covering and into the gutter system. When flashing is missing, undersized, incorrectly lapped, or improperly sealed, water can follow capillary paths into sheathing seams, nail penetrations, and wall assemblies. Over time, that moisture can lead to stained ceilings, mold, rotted decking, delaminated plywood, and compromised structural members. Flashing is not a cosmetic upgrade. It is the roof’s water management system.
Common Flashing Materials and What We Choose Them For
Flashing performance depends on both design and material. We typically select flashing based on the roof system, exposure, adjacent materials, and expected lifespan.
- Aluminum: Lightweight and easy to form, commonly used for residential flashing. It must be compatible with adjacent metals and should be coated when exposed to corrosive environments.
- Galvanized steel: Strong and cost-effective. Heavier gauges resist denting and distortion. Over time, zinc coating can wear, so detailing and drainage matter.
- Copper: Extremely durable, ideal for long service life and high-end assemblies. It should be isolated from incompatible metals to prevent galvanic corrosion.
- Stainless steel: Premium corrosion resistance, excellent near masonry and harsh environments, typically higher cost and more difficult to form.
- Lead alternatives: Used for specialized penetrations in some systems. Selection depends on code requirements and the roof type.
We also consider thickness. Thin metal may deform, oil-can, or crack at bends. Heavier gauge stock holds its shape, maintains laps, and survives thermal movement better.
Step Flashing: The Essential Wall-to-Roof Defense
Step flashing is a series of individual L-shaped metal pieces installed along a sloped roof where it meets a vertical wall, such as a dormer sidewall or a chimney chase. Each piece overlaps the shingle below and the piece beside it, creating a stair-step drainage path that moves water down the slope without relying on sealant.
Where Step Flashing Is Used
We typically use step flashing at:
- Roof-to-wall transitions on sloped roofs
- Sidewalls at dormers and second-story walls
- Tall penetrations with vertical cladding surfaces
How Proper Step Flashing Works
Each step flashing piece is layered into the shingle courses. One leg sits on the roof deck under the shingle, and the other leg rises up the wall behind siding or behind a wall flashing assembly. Water running down the roof hits the vertical leg and is redirected back onto the shingle surface.
Key detailing principles we follow:
- One piece per shingle course so water always has a dedicated exit path
- Correct overlap so water cannot reach a seam in the wrong direction
- No face-nailing through exposed flashing where fasteners can become leak points
- Adequate wall height so the vertical leg remains protected behind cladding
Common Step Flashing Failures We Avoid
- Using one long continuous piece instead of individual steps, which can trap water at nail lines and create stress points during expansion
- Installing flashing over siding rather than behind it, leaving water to flow behind cladding
- Overusing sealant in place of mechanical laps, which degrades and cracks with UV and thermal cycling
- Short vertical legs that sit too low behind siding, allowing splash-back to reach the wall assembly
Best Practice for Sidewall Integration
We aim for a layered assembly: underlayment beneath shingles, step flashing interwoven with shingles, then a wall water-resistive barrier and cladding that overlap the flashing’s vertical leg. That way, gravity and overlapping laps do the work, not caulk.
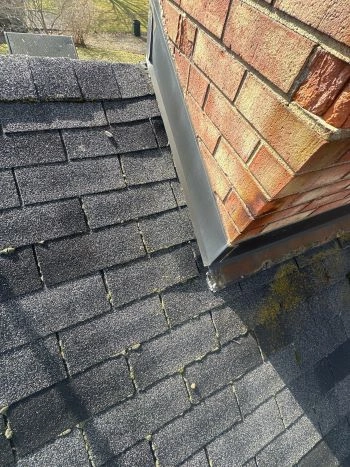
Counterflashing: The Protective Cap That Keeps Water Out
Counterflashing is the secondary flashing that covers the top edge of base flashing or step flashing, especially at masonry chimneys, brick walls, stone veneers, and stucco surfaces. Its purpose is to prevent water from entering behind the flashing at the wall side.
Where Counterflashing Is Most Important
Counterflashing is critical at:
- Chimneys and masonry walls
- Stucco or stone where water can migrate behind surface layers
- Conditions where wall cladding cannot simply overlap flashing due to material limitations
Types of Counterflashing Details
- Reglet cut counterflashing: Inserted into a saw kerf cut into mortar joints or masonry, then bent to cover the base flashing. This is a highly reliable method when executed correctly.
- Surface-mounted counterflashing: Mechanically fastened and sealed to the surface. It can perform well when properly anchored, but it depends more heavily on sealant and maintenance.
Execution Details That Make Counterflashing Last
We focus on:
- Proper embedment in mortar joints when using reglet cuts
- Sufficient overlap over base flashing to shed water cleanly
- End dams and kickouts where geometry changes, so water does not run laterally into the wall
- Movement tolerance so thermal expansion does not crack seal lines or pull fasteners
Typical Counterflashing Problems
- Counterflashing that is too short, exposing the base flashing edge and allowing wind-driven rain behind it
- Sealant-only installations with inadequate mechanical attachment
- Mortar repairs that trap the flashing edge, causing water to wick inward rather than shed outward
- Missing corner treatment at chimneys where the highest water concentration occurs
Counterflashing is not just an accessory. It is the finishing layer that completes the water-shedding system at vertical transitions.
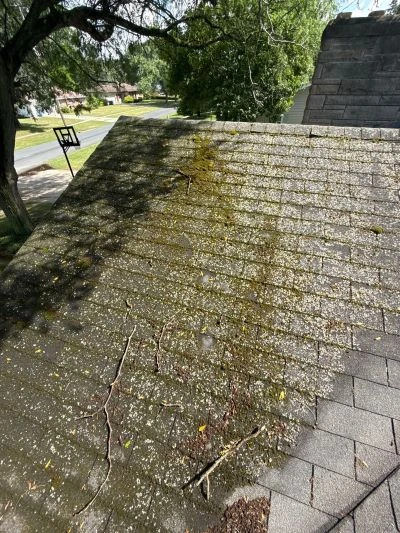
Valley Flashing Metal: Managing the Roof’s Highest Water Volume Channel
A roof valley is where two sloped roof planes meet, forming a channel that carries a large concentration of runoff. Valley flashing metal is the durable lining that protects that channel and directs water safely down the roof.
Open Valley vs Closed Valley
- Open valley: Metal is visible, and shingles terminate near the centerline. This provides a smooth, predictable drainage path and simplifies debris management.
- Closed-cut valley: Shingles cover the valley, with one side cut to form a line. It can look seamless but relies heavily on precise cuts and correct underlayment.
- W valley or ribbed valley: A raised center rib helps prevent water from crossing the centerline and reduces the chance of debris-driven backflow.
Detailing Priorities for Valley Performance
We prioritize:
- Full-width, appropriately gauged metal that resists distortion and foot traffic damage
- Hemmed edges to add rigidity and reduce sharp edges that can cut underlayment
- Ice and water barrier integration in climates where freeze-thaw and ice dams are concerns
- Clean, straight terminations so shingle edges do not form catch points for leaves and granules
Valley Failure Patterns to Watch
- Nail placement too close to the valley centerline, creating direct water entry points
- Narrow metal that forces water onto shingles during heavy flow
- Shingle debris and leaf accumulation that creates mini dams and pushes water sideways
- Improper overlaps where the upper piece does not lap correctly over the lower piece
A properly detailed valley assembly manages heavy water volumes without relying on sealants or luck.
How These Flashing Systems Work Together as One Waterproofing Strategy
Flashing is most effective when it is part of a continuous water-shedding sequence from ridge to eave. Underlayment, ice and water membrane (where appropriate), drip edge, shingles, and flashing must be layered so water always stays on the exterior side of the assembly.
We pay close attention to:
- Shingle-to-flashing laps so water never runs uphill into a seam
- Wall transitions so siding or counterflashing protects the vertical leg of step flashing
- Penetration details so each component overlaps the one below
- Ventilation and drying potential so incidental moisture does not get trapped in roof or wall cavities
A roof does not fail because one component is imperfect. It fails when water finds a continuous path inward.
Numbered Flashing Checklist: Installation and Inspection Points That Prevent Leaks
- Confirm correct layering from deck upward
We start by verifying the roof deck is sound and dry, then ensure underlayment is properly lapped in the direction of water flow. At transitions, we check that each flashing component overlaps the one below it, never the reverse. This is the foundation of water management. If layers are reversed even in a small area, water can travel under the system and appear far from the source. - Validate step flashing is one piece per course with clean overlaps
We inspect sidewalls to confirm step flashing is woven into each shingle course rather than installed as a continuous strip. Each piece should overlap the previous piece sufficiently to prevent seam exposure. We also verify fasteners are placed high and protected by the next shingle. Proper steps allow movement, prevent capillary action, and shed water consistently in heavy rain. - Check counterflashing coverage and attachment method
We ensure counterflashing fully covers the top edge of base or step flashing and directs water outward. At masonry, we look for reglet-cut installation into mortar joints or a properly secured surface-mount detail. We check corners, terminations, and vertical laps for continuity. A small gap at a chimney corner can route large volumes of water into the roof system during wind-driven storms. - Inspect valleys for width, rigidity, and fastener placement
We confirm valley flashing metal is wide enough for the roof pitch and local rainfall intensity, with hemmed edges where possible for strength. We check that nails are kept away from the center flow path and that overlaps are properly oriented. We also evaluate the valley line for debris traps and verify the shingle cuts or terminations do not direct water sideways. - Look for kickout flashing at roof-to-wall terminations
At the bottom of a roof-to-wall run, we confirm there is a kickout detail that redirects water into the gutter rather than behind siding. Without a kickout, water can discharge directly into the wall assembly and cause hidden rot. This area often shows symptoms like staining, peeling paint, or soft sheathing. A correct kickout is a small piece that prevents a big problem. - Assess sealant as secondary support, not primary waterproofing
We treat sealant as a supplemental barrier, not the main defense. We check for failed caulk beads, cracked joints, and incompatible sealants that do not bond to metal or masonry long-term. The assembly should shed water through laps and geometry even if sealant ages. When flashing depends on sealant alone, maintenance becomes constant and leaks become predictable.
Choosing the Right Approach for Your Roof and Climate
Roof geometry, siding type, and weather exposure all influence flashing choices. A complex roof with multiple dormers and chimneys benefits from robust step flashing and carefully executed counterflashing. Roofs surrounded by trees often do best with open valleys that shed debris more easily. Coastal or high-humidity areas may warrant corrosion-resistant metals and careful separation between dissimilar materials.
When assessing an existing roof, we look beyond visible metal. We evaluate how the flashing is integrated with the wall system, whether water has a clear exit path, and whether previous repairs created hidden traps such as face-nailed pieces, sealed-over seams, or buried metal edges under new layers.
If you are searching for a roofing contractor in Kalamazoo, prioritize a team that can explain the flashing plan in plain language and show how each transition is layered, not just how it looks when finished. If your search starts with roof flashing near me, focus on proven detailing skills, because flashing workmanship is where long-term performance is decided.
FAQs About Step Flashing, Counterflashing, and Valley Flashing Metal
What is the difference between step flashing and counterflashing?
Step flashing is installed in small, individual pieces that interweave with shingle courses along a wall to direct water downward. Counterflashing is installed above base flashing to cover and protect the wall-side edge, especially at chimneys and masonry. Step flashing manages water on the roof plane, while counterflashing blocks water from entering behind the flashing at the vertical surface.
Can we reuse existing flashing during a roof replacement?
Reusing flashing depends on condition, material, and compatibility with the new roofing system. If metal is corroded, deformed, face-nailed, or too short to meet current detailing needs, replacement is typically the safer option. Even if the metal looks intact, the most important factor is whether the flashing can be integrated correctly with new underlayment, shingles, and wall layers without creating reverse laps or exposed seams.
Should we choose an open valley or a closed-cut valley?
An open valley exposes metal and provides a clean drainage channel, which can be excellent for heavy rainfall and debris management. A closed-cut valley offers a uniform shingle appearance but requires precise cuts and strong underlayment detailing to manage water concentration. The right choice depends on roof pitch, local weather, tree cover, and aesthetic goals. The key is correct width, fastener placement, and laps.
What are the most common signs of flashing failure?
Common indicators include ceiling stains near chimneys or exterior walls, damp insulation, peeling paint on interior wall corners, and granule buildup or debris dams in valleys. Outside, we often see lifted shingles near walls, rusted or loose metal, cracked sealant lines, and staining on siding below roof-to-wall transitions. Because water can travel, the visible symptom may appear far from the actual entry point.
How often should flashing be inspected and maintained?
We recommend inspecting flashing at least once a year and after major wind or hail events. Valleys should be cleared of debris so water can flow freely, and sealants should be checked where they exist as secondary protection. Routine inspections help catch loose counterflashing, lifted step flashing coverage, and developing gaps before they become leaks. Preventive checks are especially valuable on roofs with chimneys, dormers, and complex intersections.
Closing Perspective: Durable Roofs Are Built on Durable Transitions
A dependable roof is not defined only by shingles or metal panels. It is defined by the precision of the transitions, where water tries hardest to enter. When step flashing, counterflashing, and valley flashing metal are designed and installed as a unified system, we reduce leak risk, preserve structural materials, and extend roof life in a measurable way. . As a roofing company in Kalamazoo, for long-lasting workmanship and water-smart detailing, we bring that standard to every project at Worthy Construction LLC.


Trustindex verifies that the original source of the review is Google. Highest praise for all of Worthy Construction. Fantastic service, advice and attention. Full roof installation plus gutters. They kept us informed about everything happening and were done on time. Efficient, quality, professional work. Highly recommended.Trustindex verifies that the original source of the review is Google. Worthy Construction replaced our roof, gutters, and repaired our front steps. Khari was professional start to finish, from taking the time to understand what we were hoping to achieve, preparing and presenting his estimate, and all the way through to his final walk through. Great communication, quality materials and work, and great crews! I recommend Worthy Construction to anyone looking for a high quality local contractor!Trustindex verifies that the original source of the review is Google. Worthy construction Did an amazing job on my roof very fast and reliable I highly recommend his services He helped us out And I appreciate it Definitely deserve 5 stars thanks again Worthy ConstructionTrustindex verifies that the original source of the review is Google. Was a great experience, excellent customer service. Work was completed in a very timely manner. Would recommend their services to anyone.Trustindex verifies that the original source of the review is Google. Worthy Construction just replaced my roof, skylights, and gutters. I live out of town and selling my parent's house so this company came through a personal referral. Khari and team were such a joy to work with. He answered my questions, kept me updated on progress, did everything he said he was going to do, and met all of commitments on time. It's not easy to know what's happening while living out of town and I appreciate Khari's communication skills, timeliness, and overall this has been an amazing experience! I highly recommend Worth Construction!!Trustindex verifies that the original source of the review is Google. Worthy Construction did an excellent job replacing our roof. They were very easy to work with throughout the entire process. They answered all of our questions promptly and delivered a great finished product. I’d highly recommend them for your roofing needs.Trustindex verifies that the original source of the review is Google. Very professional, great guy that will work with you. Highly recommended for sure. Mr. Worthy is very dependable! He completed our roof on time and as expected!Trustindex verifies that the original source of the review is Google. Greatest service ever! Super fast and did a fantastic job. I will definitely save them to do future jobs that need to be fixed. The greatest ever!Trustindex verifies that the original source of the review is Google. My roof was very damaged, I had a huge hole in my roof from constant tree debris and age. I didn’t have any expectations going in to the project but I was greatly impressed with the speed of service! The ten we done in 2 days! They cleaned up afterwards, the materials were great quality and . The team replaced my entire rooftop. Mr. Worthy was very respectful and responsive to my concerns regarding the project, I would certainly recommend his company to anyone looking for a new rooftop!Trustindex verifies that the original source of the review is Google. He was a pleasure to work with. They were prompt and professional the whole project. He kept me informed the whole process and his work was of the highest quality. They were very respectful of my and my neighbor's properties. I am very very happy with the work they did for me.