Storm Damage Roof Repair: Steps to Take Immediately After Severe Weather
When a severe storm tears through your neighborhood and you step outside to see shingles in the yard, branches on the roof, or water stains on your ceiling, it is completely normal to feel stressed and unsure what to do next. In those first critical hours, the actions you take can dramatically affect your safety, the cost of repairs, and how smoothly your insurance claim goes. Whether you are facing missing shingles, leaks, or major structural issues, understanding what to do after storm roof damage will help you protect your home, your family, and your investment, and this is exactly where a trusted roofing partner like Worthy Construction becomes invaluable.
1. First Things First: Safety Before Everything Else
Before you worry about photos, insurance, or even the roof itself, prioritize safety. A storm-damaged property can hide dangers that are not immediately obvious.
Stay alert to these hazards:
- Downed power lines – Treat every wire as if it is live and extremely dangerous. Keep yourself, children, and pets far away.
- Loose or falling debris – Limbs, shingles, gutters, and other materials may still be unstable.
- Compromised structure – A roof that looks intact from the ground may actually be weakened and unsafe to walk under or on.
- Broken glass and sharp metal – Windows, skylights, and siding can shatter and create hidden hazards.
- Flooded areas – Water can hide electrical dangers, holes, and sharp debris.
Essential safety rules immediately after the storm:
- Do not climb onto the roof to inspect damage.
- Avoid using candles near possible gas leaks or flammable materials.
- If you smell gas, hear hissing, or suspect a leak, exit the home immediately and contact your utility company and emergency services.
- Keep kids and pets away from damaged areas.
Your roof can be repaired. Your safety is irreplaceable. Only once you know everyone is safe should you move on to inspection and storm damage roof repair planning.
2. What To Do After Storm Roof Damage: A Clear Step-by-Step Overview
In the chaos after severe weather, it helps to follow a simple, logical process. Here is a high-level overview of what to do after storm roof damage:
- Ensure safety of everyone on the property.
- Inspect from the ground and inside for visible signs of roof damage.
- Create a storm damaged roof checklist and mark everything you see.
- Begin documenting storm damage for insurance with photos, videos, and notes.
- Prevent further damage by covering exposed areas where possible.
- Contact a professional roofing contractor for a full inspection.
- Notify your insurance company and begin the claims process.
- Work with your roofer and insurer to plan repairs or replacement.
- Implement preventative improvements to strengthen your roof for future storms.
The rest of this guide will walk you through each step in detail so you can move from overwhelmed to in control.
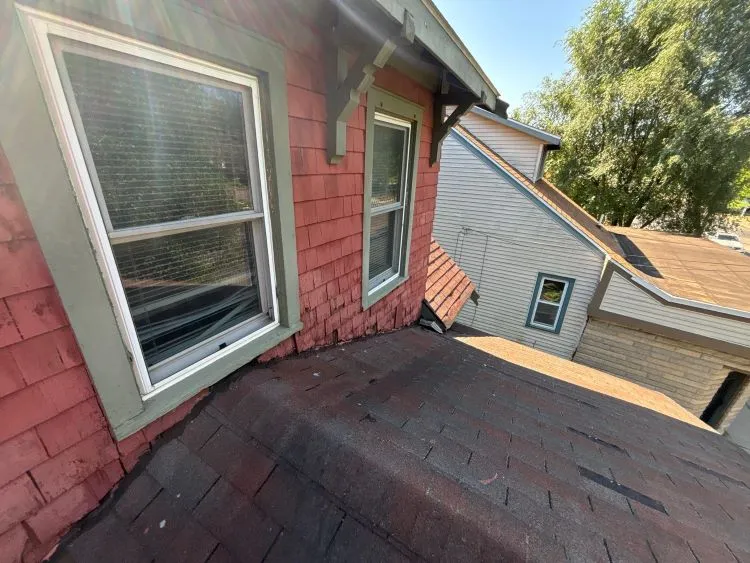
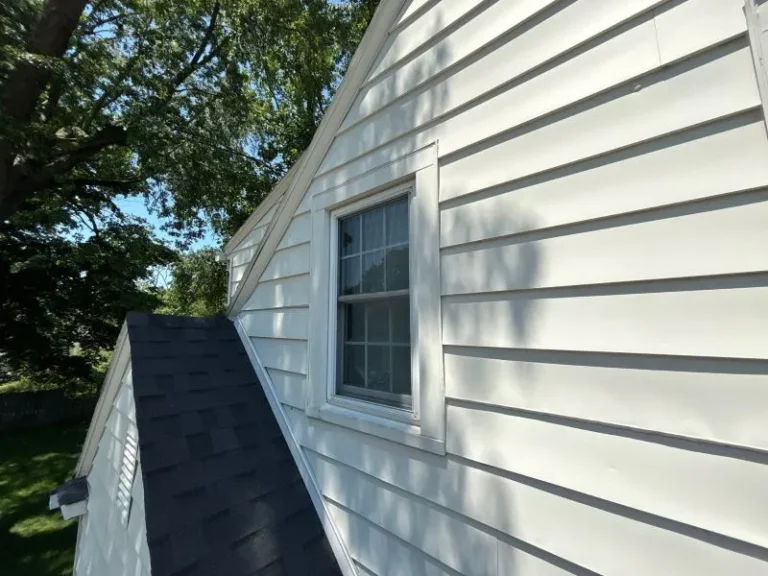
3. Ground-Level Inspection: What You Can Safely Check Yourself
You do not need to be a roofing expert to spot obvious signs of storm damage from safe vantage points. Start with a ground-level visual inspection.
Look for visible damage around your property
Walk carefully around your home and look for:
- Missing, curled, or cracked shingles
- Shingles in the yard or driveway
- Pieces of metal flashing on the ground
- Broken or hanging gutters and downspouts
- Debris on the roof like large tree branches or objects blown by wind
- Damaged fascia or soffits
- Loose siding or trim around the roofline
Do not climb a ladder or step onto the roof. Leave close-up inspection to professionals with safety gear and training.
Check your attic and ceilings
Inside your home and attic, look for:
- Water stains on ceilings or walls
- Drips or active leaks
- Damp insulation or framing
- Sunlight visible through the roof boards
- Musty smells that suggest moisture intrusion
If you find active leaks, place buckets or containers under the dripping areas and move furniture or valuables out of the way.
4. Your Storm Damaged Roof Checklist: What To Record
A thorough storm damaged roof checklist will help you stay organized, support your insurance claim, and give your roofing contractor a clear starting point.
You can write this on paper, in a notes app, or in a spreadsheet. The key is to be detailed and systematic.
Exterior roof checklist
From the ground or a safe distance, note:
- Approximate areas of missing shingles (front, back, left, right, near chimney, etc.)
- Any obvious holes, punctures, or sagging spots
- Flashing damage around chimneys, skylights, vents, and walls
- Gutters and downspouts that are bent, torn, or missing
- Debris that may have struck or settled on the roof
Example entries:
- “Front right corner – several missing shingles near gutter”
- “Back side – large branch resting on roof, possible penetration”
Attic and ceiling checklist
Inside your home, record:
- Location and size of water stains
- Areas with active drips or wet spots
- Rooms affected by ceiling discoloration
- Any insulation that appears wet or matted
Example entries:
- “Living room – 2-foot water stain near light fixture”
- “Attic above kitchen – damp insulation, visible drip during rain”
Surrounding property checklist
Document damage that helps show the severity of the storm:
- Fallen trees or large branches
- Damage to fences, sheds, or other structures
- Broken windows or damaged doors
- Nearby homes with visible roof damage
All of this information creates context that supports your claim that the storm caused serious damage in your area.
5. Documenting Storm Damage For Insurance: Do It Before Cleanup
One of the most important steps is documenting storm damage for insurance before you move debris, throw away damaged materials, or make permanent repairs.
Take clear photos from multiple angles
Use your phone or camera to capture:
- Wide shots of the entire roof from different sides of the property
- Close-up shots (as close as safely possible) of damaged sections
- Photos of shingles, metal, and debris on the ground
- Interior photos of ceilings, walls, and attic damage
- Any damaged gutters, flashing, siding, or windows
- Fallen branches or objects that impacted the roof
Tip: Turn on the timestamp feature in your camera settings if available, or ensure the device date and time are correct.
Film short videos
Videos can show the scope of damage more clearly:
- Walk around the home narrating what you see.
- Show dripping water or active leaks inside.
- Capture the overall condition of your property and surrounding homes if also damaged.
Write a damage log
In addition to photos and videos, keep written notes that include:
- The date and time of the storm.
- The type of storm (hail, heavy wind, tornado activity, extreme rain).
- Any sounds or events you noticed during the storm, such as a loud crack of a tree hitting your roof.
- When you first noticed leaks or stains.
Save all receipts and communication
After the storm, keep records of:
- Temporary repairs (tarping, emergency patching).
- Hotel stays or temporary housing if your home is uninhabitable.
- Clean-up services, debris removal, or water mitigation.
- Any communication with your insurance company and roofing contractor.
All of this will help your insurer understand the full extent of your losses and speed up reimbursement.
6. Contacting Your Insurance Company: How To Do It Smartly
Once you have safely documented the damage, it is time to contact your homeowners insurance provider.
Key steps when notifying your insurer
- Call the claims department or file a claim through the company’s website or mobile app.
- Provide basic details:
- Date and time of the storm
- Type of damage observed
- Whether there are active leaks or safety concerns
- Ask about:
- Required forms or documents
- Whether they need you to obtain estimates from licensed roofers
- How and when an adjuster will visit your property
What to avoid saying
You do not need to speculate about the cause of every specific crack or leak. Stick to the facts that you can clearly observe. For example:
- Right: “After the hailstorm, we noticed missing shingles and water coming in through the living room ceiling.”
- Avoid: “I think the roof was already old, so maybe it is my fault.”
You are not an adjuster or a roofing expert, so you do not need to diagnose the cause in technical terms.
Ask about temporary repairs
Most insurance policies expect you to mitigate further damage. That means you should:
- Cover exposed areas if possible.
- Stop active leaks from spreading.
However, always ask your insurer if there are any specific guidelines on temporary repairs and what documentation they require for reimbursement.
7. Temporary Measures To Protect Your Home From Further Damage
While you wait for a professional roofing contractor and the insurance adjuster, it is important to take reasonable steps to prevent more damage.
Tarping exposed sections
If part of your roof is missing or punctured, a tarp can:
- Reduce water intrusion.
- Protect the underlying structure.
- Prevent interior damage from getting worse.
For safety reasons, it is best to have a licensed roofer or trained professional install tarps. Walking on a storm damaged roof can be extremely dangerous.
Managing active leaks inside
To limit interior damage:
- Place buckets or containers under drips.
- Move furniture, electronics, and valuables out of affected rooms.
- Use plastic sheeting or drop cloths to protect flooring and large items.
- Turn off electricity in areas where water is entering near light fixtures or outlets, if you can do so safely at the breaker panel.
These steps will help keep repair costs down and demonstrate to your insurance company that you did your part to minimize losses.
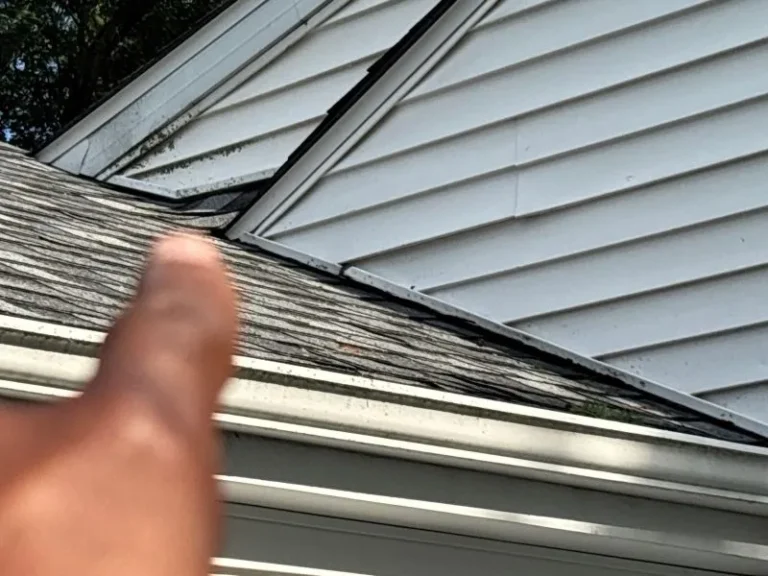
8. Why You Need A Professional Roof Inspection After A Storm
Even if the damage seems minor, a professional roof inspection is crucial. Some of the most serious storm damage is subtle and easily overlooked by homeowners.
Hidden issues a roofer can detect
An experienced roofing services can identify:
- Bruised or fractured shingles from hail that are not visibly obvious but likely to fail later.
- Granule loss that shortens the lifespan of your roof.
- Loose or compromised flashing that can lead to leaks.
- Decking damage beneath the shingles.
- Structural shifts or sagging that signal deeper problems.
A certified inspection document also provides strong support for your insurance claim.
What a thorough storm damage inspection includes
A reputable roofer will:
- Inspect the entire roofing system, including shingles, underlayment, flashing, vent boots, skylights, and chimneys.
- Check gutters and downspouts for granule buildup and damage.
- Examine the attic for signs of moisture, mold, or structural issues.
- Provide photo evidence and a detailed written report.
- Offer repair or replacement recommendations and a clear estimate.
This report can be shared with your insurance adjuster to help ensure all legitimate damage is covered.
9. Choosing The Right Roofing Contractor After Storm Damage
After a major storm, you may see an influx of roofing trucks and door-to-door contractors in your neighborhood. It is tempting to hire the first person who offers help, but choosing the right roofing contractor is critical.
Watch out for storm chasers
Storm chasers are out-of-town or unlicensed contractors who:
- Pressure you to sign paperwork immediately.
- Offer deals that sound too good to be true.
- Cannot provide local references or proof of insurance.
- Disappear once the job is done, leaving you with poor workmanship or unresolved issues.
What to look for in a trusted roofer
Choose a roofing company that:
- Is licensed, insured, and bonded in your state.
- Has a physical local office and a track record in your community.
- Provides written estimates and clearly explains the work.
- Is experienced with insurance claims and can meet with your adjuster.
- Offers warranties on materials and workmanship.
- Communicates professionally and transparently.
A strong roofing partner will not only repair your current damage but also help you strengthen your roof for future storms.
10. Common Types Of Storm Damage To Roofs
Understanding the type of storm that hit your home helps you know what specific signs of damage to look for.
Wind damage
High winds can:
- Tear off shingles.
- Lift and crease shingles so they no longer seal properly.
- Loosen flashing and ridge caps.
- Rip off gutters and drip edges.
Look for missing, curled, or lifted shingles, especially along the edges and peaks of the roof.
Hail damage
Hail can cause:
- Dark circular spots or bruises on shingles.
- Granule loss, exposing the asphalt underlayer.
- Cracks or breaks in shingles.
- Dents in gutters, vents, and metal flashing.
Hail damage is often subtle from the ground but can drastically shorten the roof’s lifespan.
Heavy rain and water intrusion
Wind-driven rain can:
- Force water under shingles.
- Exploit small gaps in flashing, vents, and skylights.
- Lead to leaks, rot, and mold if not addressed quickly.
Signs include water spots, ceiling discoloration, peeling paint, and damp smells.
Fallen objects and debris
Branches, tree limbs, and flying objects can:
- Puncture the roof.
- Crack decking.
- Damage chimneys and skylights.
Any direct impact on your roof deserves an immediate professional inspection.
11. Repair vs Replacement: How To Decide
After inspection, you will need to decide whether your roof can be repaired or needs a full replacement.
When repairs may be enough
Repairs might be sufficient if:
- Damage is localized to a small area.
- The roof is relatively new and in otherwise good condition.
- There is no significant structural damage.
In these cases, replacing damaged shingles, repairing flashing, and addressing minor leaks might restore your roof to full function.
When replacement is the smarter option
A full roof replacement may be recommended if:
- The roof is near the end of its lifespan.
- Damage is widespread across multiple areas.
- Hail or wind has compromised the overall integrity of the shingles.
- The cost of repeated repairs would soon exceed the cost of replacement.
Your roofing contractor can provide an honest assessment and estimate for each option, and your insurance coverage may help make roof replacement financially feasible.
12. Strengthening Your Roof Against Future Storms
Once your immediate repairs are underway or completed, it is wise to think ahead. You can take several preventive steps to reduce future storm damage.
Regular maintenance
- Schedule annual roof inspections.
- Keep gutters and downspouts clear so water flows freely.
- Replace damaged shingles or flashing promptly.
- Watch for early signs of moss, algae, or rot.
Trimming trees and managing landscaping
- Trim back branches hanging over the roof.
- Remove dead or diseased trees that could fall during a storm.
- Ensure large trees near the home are evaluated regularly by a professional arborist.
Upgraded roofing materials
If you are replacing your roof, consider:
- Impact-resistant shingles that provide better protection against hail.
- Improved underlayment to resist leaks.
- Enhanced ventilation to maintain roof health.
These upgrades can make your home more resilient and may even qualify you for insurance discounts in some cases.
FAQs About Storm Damage Roof Repair
1. How soon should I have my roof inspected after a storm?
It is recommended to schedule an inspection within 24–48 hours after a storm. Quick action helps prevent minor issues from developing into major water damage and strengthens your insurance claim with timely documentation.
2. What are the most common types of storm damage to roofs?
The most common issues include missing shingles, hail dents, cracked flashing, granule loss, clogged gutters, and leaks. High winds and fallen debris can also cause punctures and structural weaknesses that require professional attention.
3. Will insurance cover the cost of storm damage roof repair?
Most homeowner insurance policies cover storm-related roof damage. However, coverage may vary depending on your policy. Proper documentation and working with a trusted roofing contractor help maximize your claim approval.
4. Can I repair storm damage myself?
While homeowners can perform basic inspections, professional repairs are strongly recommended. Climbing on a damaged roof is dangerous, and improper repairs may void insurance claims or cause additional damage.
5. How do I find reliable storm damage roof repair near me?
Look for licensed, insured, and experienced roofing contractors with strong local reputations. Reading reviews, checking credentials, and asking for references ensure you choose a company you can trust—like Worthy Construction LLC.
Taking Control After The Storm
The hours and days after severe weather can be overwhelming, but you are not helpless. By staying safe, following a detailed storm damaged roof checklist, and carefully documenting storm damage for insurance, you give yourself the strongest possible position to restore your home quickly and correctly.
Remember to:
- Put safety first for you and your family.
- Perform a careful visual inspection from the ground and inside.
- Capture clear photos, videos, and notes before cleanup.
- Contact both your insurance company and a trusted roofing contractor.
- Make temporary repairs to stop further damage when safe and appropriate.
- Decide on repair or replacement with professional guidance.
Most importantly, you do not have to go through this process alone. If you have been searching for a roofing company near me, partnering with an experienced, reputable team like Worthy Construction gives you expert eyes on your roof, support throughout the insurance claim process, and the confidence that your storm damage roof repair will be handled with care, precision, and long-term protection in mind.


Trustindex verifies that the original source of the review is Google. Khari and his team are incredible. From communication, to competitive pricing on work, Worthy Construction has it covered. I’m loving my brand new windows, and my friends love their new roof! Thank you Worthy ConstructionTrustindex verifies that the original source of the review is Google. Khari was very easy to work with, taking care of my house in a hurry with an active leak. Thanks for a job well done at a great price!Trustindex verifies that the original source of the review is Google. Top notch customer service!! Khari is the best.Trustindex verifies that the original source of the review is Google. Worthy Construction fought and won against my insurance company to get my roof replaced after the tornado and high winds of 2024. The absolute professionalism was impeccable along with the crew and the time it took. I highly recommended Worthy Construction, they are high skilled at what they doTrustindex verifies that the original source of the review is Google. Khari, Worthy construction , and all their employees are the most friendly construction crew we have worked with. After our initial project with our roof and gutters, we couldn’t wait to have his team replace our siding. Worthy Construction was fair, prompt, knowledgeable, efficient, clean and professional. We are very pleased we chose Worthy Construction for our project! Thank you Khari and team.Trustindex verifies that the original source of the review is Google. Khari came on time to inspect and give an estimate. I received the estimate in a timely fashion. It was reasonable. He is very personable and easy to reach. I have had him out for a couple of different things. This company is amazing. His sign is up all over my neighborhood. Thank you!!!!Trustindex verifies that the original source of the review is Google. I used worthy construction very recently when I came home from work and found water damage inside. A neighbor reached out saying how great Mr. Worthy was. I reached out to him and he was able to come over that day and give me an estimate. I went through with his services and the communication was great. I enjoyed the picture evidence of their work along the way and the explanations. There was a break in between all of the winter storms and Mr.Worthy and his team were able to get it done as quick as possible. They were also able to repair the inside ceiling and paint for me. I really appreciated everything they did for me. Everything looks great and would use them again as well as recommend them in a heart beat. Mr. Worthy and his team are top notch.Trustindex verifies that the original source of the review is Google. We are so grateful for the great communication and the prompt, excellent service we received. This company truly cares and we are especially grateful for their support of our military veterans!Trustindex verifies that the original source of the review is Google. Highest praise for all of Worthy Construction. Fantastic service, advice and attention. Full roof installation plus gutters. They kept us informed about everything happening and were done on time. Efficient, quality, professional work. Highly recommended.